TicketPayGo Documentation
Welcome to the TicketPayGo documentation. Here you'll find all the information to set up your events, sell tickets and check in visitors.
Quick Start (5 minutes)
Get your first event live in 5 steps. Follow this checklist to get started quickly.
Install Plugin
Download the plugin from your account portal and upload to WordPress via Plugins > Add New > Upload Plugin.
Activate License
Go to TicketPayGo > Settings and enter your license key. You receive this via email after signup.
Connect Payment Provider
Choose Stripe, PayPal or Mollie. Enter your API keys at Settings > Payments. This is a one-time setup.
Create Event
Go to TicketPayGo > Events > New Event. Fill in title, date, location and capacity.
Add Tickets
Add at least one ticket type with name and price. Publish the event and you're ready to sell.
Installation and Activation
System Requirements
- WordPress 5.0 or higher
- PHP 7.4 or higher
- SSL certificate (HTTPS) for payments
Install Plugin
- Log in to your TicketPayGo account
- Download the plugin (.zip file)
- In WordPress go to Plugins > Add New
- Click Upload Plugin and select the .zip file
- Click Install Now and then Activate
Activate License
- Go to TicketPayGo > Settings > License
- Enter your license key (received via email)
- Click Activate
One-time Setup
Configure these settings once. After that, you can create unlimited events.
Connect Payment Provider
TicketPayGo supports three payment providers: Mollie (iDEAL + more), Stripe (Credit Cards), and PayPal. Choose the one that fits your needs and follow the setup guide below.
- Mollie: Best for European customers. Supports iDEAL, Bancontact, credit cards, and more.
- Stripe: Global solution, excellent for credit card payments worldwide.
- PayPal: Widely recognized, good for international customers who prefer PayPal.
Wero is the new EU-wide payment solution that will eventually replace iDEAL and other national payment methods across Europe. TicketPayGo will add Wero support once it's fully rolled out and integrated by payment providers like Mollie and Stripe.
 iDEAL, Bancontact & Credit Cards
Step 1: Create Mollie Account
- Go to mollie.com/signup and create an account
- Complete the onboarding process and verify your business details
- Once approved, log in to your Mollie Dashboard
Step 2: Get API Keys
- In Mollie Dashboard, go to Developers → API keys
- You'll see two types of keys:
- Test API key (starts with
test_) - for testing without real money - Live API key (starts with
live_) - for real transactions
- Test API key (starts with
- Copy the Test API key first (we'll test before going live)
Step 3: Configure in TicketPayGo
- In WordPress, go to TicketPayGo → Settings → Payment Methods
- Find the Mollie section
- Paste your Test API key in the Mollie API Key field
- Check the Test Mode checkbox
- Click Save Settings
Step 4: Test & Go Live
- Create a test event and try purchasing a ticket
- Use Mollie's test payment methods (they provide test card numbers)
- Verify you receive the ticket email with QR code
- When ready for production:
- Copy your Live API key from Mollie
- Replace the Test key in TicketPayGo settings
- Uncheck Test Mode
- Save settings
 Credit Cards Worldwide
Step 1: Create Stripe Account
- Go to stripe.com/register and create an account
- Complete the business verification process
- Log in to your Stripe Dashboard
Step 2: Get API Keys
- In Stripe Dashboard, click Developers in the top menu
- Go to API keys
- You'll see:
- Publishable key (starts with
pk_test_orpk_live_) - Secret key (starts with
sk_test_orsk_live_) - click "Reveal test key"
- Publishable key (starts with
- Copy both the Test Publishable key and Test Secret key
Step 3: Configure in TicketPayGo
- In WordPress, go to TicketPayGo → Settings → Payment Methods
- Find the Stripe section
- Paste your Test Publishable Key (starts with
pk_test_) in the Publishable Key field - Paste your Test Secret Key (starts with
sk_test_) in the Secret Key field - Check the Test Mode checkbox
- Click Save Settings
- The plugin will automatically create and configure the webhook for you — no manual steps needed. You will see a green "✓ Fully configured" confirmation in the Stripe section.
Step 4: Verify Webhook Security
The plugin automatically creates and registers your webhook when you save your API keys. Once you see "✓ Fully configured" in the Stripe settings, your webhook is active and secure.
Manual fallback (only if auto-setup failed):
- In Stripe Dashboard, go to Developers → Webhooks
- Click + Add endpoint
- Enter your webhook URL:
https://yoursite.com/?ticketpaygo_webhook=stripe - Replace
yoursite.comwith your actual domain - Under Select events to listen to, choose:
checkout.session.completedcheckout.session.expired
- Click Add endpoint, then click on the new webhook to view its details
- Click Reveal next to "Signing secret" (starts with
whsec_) and copy it - Go back to TicketPayGo → Settings → Payment Methods → Stripe and paste it in the Payment Security field
- Click Save Settings
Step 5: Test & Go Live
- Create a test event and try purchasing a ticket
- Use Stripe's test card:
4242 4242 4242 4242, any future expiry, any CVC - Verify the payment completes and you receive the ticket email
- When ready for production:
- Toggle to Live mode in Stripe Dashboard (top right)
- Copy your Live Publishable key and Live Secret key
- Create a new webhook endpoint for live mode (same URL)
- Copy the Live Webhook Signing Secret
- Update all three keys in TicketPayGo settings
- Uncheck Test Mode
- Save settings
 PayPal & Credit Cards
Step 1: Create PayPal Business Account
- Go to paypal.com/business and create a business account
- Complete the verification process
- Log in to your PayPal account
Step 2: Create REST API App
- Go to PayPal Developer Dashboard
- Log in with your PayPal business account
- Click Apps & Credentials
- Make sure you're on the Sandbox tab (for testing)
- Click Create App
- Enter an app name (e.g., "TicketPayGo")
- Click Create App
Step 3: Get API Credentials
- After creating the app, you'll see:
- Client ID - copy this
- Secret - click "Show" and copy this
- Keep these credentials safe
Step 4: Configure in TicketPayGo
- In WordPress, go to TicketPayGo → Settings → Payment Methods
- Find the PayPal section
- Paste your Client ID in the first field
- Paste your Client Secret in the second field
- Check the Sandbox Mode checkbox (for testing)
- Click Save Settings — the plugin handles everything automatically.
Step 5: Test & Go Live
- Create a test event and try purchasing a ticket
- Use PayPal's sandbox test accounts (create them in Developer Dashboard)
- Verify the payment flow works and you receive the ticket email
- When ready for production:
- In PayPal Developer Dashboard, switch to Live tab
- Create a new app for live mode
- Copy the Live Client ID and Live Secret
- Update both credentials in TicketPayGo settings
- Uncheck Sandbox Mode
- Save settings — no webhook configuration needed
- Always test first: Use test mode to verify the entire payment flow before going live
- Webhook troubleshooting: Check your WordPress error logs if payments aren't confirming automatically
- SSL required: Your site must use HTTPS for payment providers to work
- Currency matching: Make sure your TicketPayGo currency matches your payment provider's account currency
Email Templates
Go to TicketPayGo > Settings > Emails. Here you can customize:
- Confirmation email: Sent after successful payment
- Ticket email: Contains the QR code and event details
- Sender name and email: Customize to your organization name
Basic Settings
- Currency: Choose your default currency (EUR, USD, etc.)
- Date format: Set how dates are displayed
- Checkout page: Select or create a page for checkout
- Terms & Privacy: If the Terms or Privacy URL fields are filled in, the links will be shown in the checkout modals. If they are left empty, those links stay hidden.
- Thank you page: Where visitors land after payment
WooCommerce Order Sync (Optional)
If you also sell products through WooCommerce, you can optionally sync ticket purchases to WooCommerce orders. This keeps all your orders in one place for easier management.
- Unified order management: View all orders (products + tickets) in WooCommerce's order overview
- Guest customer tracking: Ticket buyers appear in WooCommerce even without a user account
- Better customer insights: See complete purchase history when customers buy both products and tickets
- No duplicate data: Tickets, QR codes, and check-ins stay in TicketPayGo — only order references sync to WooCommerce
Enabling Order Sync
- Make sure WooCommerce is installed and activated
- Go to TicketPayGo → Settings → WooCommerce Integration
- Check "Sync Orders to WooCommerce"
- Save settings
When enabled, every ticket purchase automatically creates a corresponding WooCommerce order. The order includes the event name, ticket quantity, and customer details. The order status updates automatically: "Pending" while awaiting payment, "Completed" when payment is confirmed. If an order is cancelled in TicketPayGo, the WooCommerce order is also cancelled.
Create Event
Go to TicketPayGo > Events > New Event to add an event.
Basic Information
- Title: The name of your event
- Description: Detailed information about the event
Date and Time
- Start date: When the event begins
- End date: Optional, for multi-day events
- Start and end time: The times of the event
- Timezone: Automatically taken from WordPress
Location
- Venue name: Name of the venue
- Address: Street, number, postal code, city
- Online event: Check for virtual events
Capacity
- Maximum capacity: Total number of available spots
- Per ticket type: You can also set a limit per ticket type
Recurring Events
TicketPayGo supports recurring events:
- Daily, weekly, biweekly, monthly or yearly
- Select specific days (e.g., every Monday and Wednesday)
- Set an end date or number of repetitions
- Apply changes to all future instances
AI Event Text
The AI Event Text button helps you write or improve your event description. It is available on every event edit page, right next to the description editor.
How it works
Open any event via TicketPayGo > Events > Edit. Below the description field you will see a purple button with a sparkle icon: AI Event Text. Click it to open the AI assistant panel.
Generate from Scratch
If your description field is empty, the AI generates a complete, polished event description based on your event title and ticket types. The text is written in the same language as your WordPress admin interface.
- Make sure your event has a title and at least one ticket type.
- Click AI Event Text.
- Choose Generate in the panel.
- Review the preview that appears. If you like it, click Apply to editor to insert the text into the description field.
Enhance Existing Text
If you already wrote a draft, the AI can improve it: make it more engaging, fix grammar, adjust tone, or restructure paragraphs. The AI detects the language from your existing text and responds in the same language.
- Write your draft in the description editor.
- Click AI Event Text.
- Choose Enhance in the panel.
- Review the improved version. If you like it, click Apply to editor to replace your draft.
Set Up Tickets
Each event needs at least one ticket type. You can create multiple types.
Add Ticket Type
In the event edit screen, scroll to Tickets and click Add Ticket Type.
- Name: E.g., "Standard", "VIP", "Early Bird"
- Description: What's included with this ticket
- Price: Amount in your set currency
- Stock: Number of available tickets of this type
- Minimum/Maximum per order: How many can someone buy
Free Tickets
Set the price to 0 for free tickets. Visitors still go through checkout to fill in their details and receive a confirmation.
Paid Tickets
For paid tickets, the visitor is redirected to your provider's payment page. After successful payment:
- They receive a confirmation email
- They get an e-ticket with QR code
- They can add the ticket to Apple Wallet or Google Wallet
Availability Period
- Sales start: From when tickets are available
- Sales end: Until when tickets can be purchased
Promo Codes
Promo Codes let you offer controlled discounts during checkout. You can use them for early-bird campaigns, partner codes, VIP invitations, last-minute promotions, or private discounts for a specific event.
Enable Promo Codes
- Go to TicketPayGo > Settings.
- Open the Feature Settings section.
- Enable Promo Codes and save your settings.
- The Promo Codes menu item will appear under TicketPayGo only when the feature is enabled.
Create a Promo Code
- Go to TicketPayGo > Promo Codes.
- Enter the code customers will type at checkout, for example
EARLYBIRD10orVIP25. - Choose Percentage for a percentage discount or Fixed amount for a currency discount.
- Set the discount value, optional minimum order amount, maximum uses, start date, and end date.
- Choose whether the code applies to all events or only selected events.
- Save the promo code.
How Customers Use It
- Customers enter the promo code in the booking modal or Quick Checkout.
- TicketPayGo validates the code against the event, order amount, active dates, and usage limit.
- When valid, the discount is shown immediately and the order total is updated before payment.
- The applied promo code is stored with the order for reporting and campaign tracking.
Free Event Controls
When running free events, TicketPayGo gives you two per-event settings to prevent abuse and keep your headcount accurate. Both are found in the event edit page under the Ticketing section.
One Order per Email
When this checkbox is enabled, each email address can only place one order for that specific event. If someone tries to register again with the same email, checkout is blocked with a clear message. Cancelled and refunded orders do not count, so a genuine cancellation can re-register.
- Open the event via TicketPayGo > Events > Edit.
- Scroll to the Event Settings section.
- Check Limit each email address to one order for this event.
- Save the event.
Max Tickets per Order
This number field sets the maximum number of tickets a single order can contain. Set it to 0 for no limit. For example, entering 5 means no single order can claim more than 5 spots — useful when you want to prevent one person from reserving seats for a large group.
- Open the event via TicketPayGo > Events > Edit.
- Scroll to the Ticketing section.
- Set Max Tickets per Order to the desired maximum (e.g. 5).
- Save the event. TicketPayGo enforces this limit server-side at checkout.
Checkout & Emails
Checkout Process
The checkout process works as follows:
- Visitor selects tickets and quantity
- Fills in name and email address
- Chooses payment method (for paid tickets)
- Is redirected to payment provider
- Returns to thank you page after payment
Quick Checkout
Quick Checkout combines ticket selection, customer details, payment method, and terms agreement into one streamlined modal on the event page.
- Tickets are selected directly in the event view
- The customer fills in name, email, and optional phone number
- The payment method is chosen without leaving the page
- Terms & Privacy links appear only when the URLs are configured in Settings
Ticket Email
After successful payment, the buyer automatically receives:
- Confirmation email with order details
- QR code ticket directly in the email (PNG image)
- Link to add ticket to Apple Wallet (iPhone) or Google Wallet (Android)
- Link to add event to calendar (Google Calendar, Apple Calendar, Outlook)
QR Code
Each ticket contains a unique QR code. This code:
- Is linked to the specific order
- Can only be scanned once
- Shows ticket type and name when scanned
Mobile Wallets (Apple Wallet & Google Wallet)
Visitors can add their ticket to Apple Wallet (iPhone) or Google Wallet (Android) via the link in the email. The ticket shows:
- Event name and date
- Location
- QR code for check-in
- Ticket type
- Attendee name
"Manage your tickets" link
Every confirmation email automatically includes a "Manage your tickets" link at the bottom. This link allows customers to:
- View their order details and ticket status
- Resend tickets to their email if they lost them
- Access without needing a password or account
Setup (one-time)
- Go to TicketPayGo > Email Settings
- Check "Show 'Manage Tickets' Link" (enabled by default)
- Create a new page (e.g., "My Tickets")
- Add the shortcode
[ticketpaygo_order_lookup]to the page - Publish the page - done!
How it works for customers
When a customer clicks the "Manage your tickets" link in the email:
- They are directly sent to their order overview
- They see their tickets, event details, and order
- They can resend their tickets
- The link remains valid for 30 days
The link is secure and only works for the person who placed the order.
Ticket Transfers
Ticket transfers let the original buyer securely transfer a ticket to someone else. When the recipient completes the transfer, TicketPayGo updates the ticket holder details and regenerates the QR code so the old ticket can no longer be used.
Setup
- Create a page and add the shortcode
[ticketpaygo_transfer]to it. Transfer links in confirmation emails will point to that page automatically. - Open the event and enable Allow Ticket Transfers for that specific event. Optionally set a transfer deadline.
- Save the event. Confirmation emails for that event will now include a secure transfer link for each ticket.
How it works
- The buyer receives a secure transfer link for each eligible ticket.
- Opening the link only shows the transfer form; the link is not consumed by clicking it.
- The link expires only after the recipient completes the transfer.
- After completion, TicketPayGo updates the ticket holder and generates a new QR code for the new owner.
- Both the new owner and the original buyer receive confirmation emails.
Mobile Wallets
After purchase, attendees receive a link in their confirmation email to save their ticket to their phone wallet. Apple Wallet works on iPhone and Apple Watch. Google Wallet works on Android devices.
How to Enable
Both Apple Wallet and Google Wallet are activated automatically when you connect the QR Scanner. No separate configuration is needed.
- Go to TicketPayGo > Scanner in your WordPress admin
- Click Generate Connection Code
- Open the scanner app and enter the connection code — this pairs the scanner and activates both wallet passes automatically
- Go to TicketPayGo > Email Settings and confirm the Apple Wallet and Google Wallet buttons are enabled (they are on by default)
That is all. The wallet buttons will appear in every confirmation email from that point on.
What the Pass Shows
- Event name
- Event date and time
- Location
- Ticket type
- Attendee name
- QR code for check-in
- Order number
Wallet Buttons in Email
Both buttons are included in the confirmation email by default. You can toggle them individually under TicketPayGo > Email Settings.
Scanner & Check-in
The web-based scanner works on any device with a camera. No app installation needed.
Set Up Scanner
- Go to TicketPayGo > Scanner in your WordPress admin
- Click Generate Connection Code
- Open ticketpaygoscan.upkyk.com on your phone (or scan the QR code)
- Enter the connection code in the mobile app
- Select your site and start scanning
Scanning
- Open the scanner URL on your phone or tablet
- Grant permission for camera access
- Point the camera at the ticket's QR code
- The result appears directly on screen
Multiple Scanners
Depending on your subscription, you can use multiple scanners simultaneously:
- TicketPayGo: 2 scanners included
- TicketPayGo Multi: 4 scanners included
- TicketPayGo Venue: 7 scanners included
- Extra scanners: Available for €20 per month per scanner
Understanding the Scanner Screen
The scanner header shows at a glance what's happening at your event.
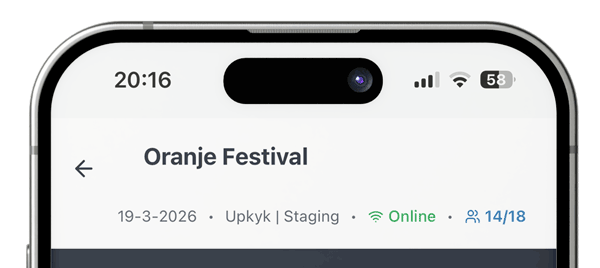
The Check-in Counter (e.g. 12/50)
The X/Y counter in the header shows: X = tickets checked in so far, Y = total tickets sold. So 12/50 means 12 tickets have been checked in out of 50 total tickets. Note: One person can have multiple tickets — the counter always shows tickets, not people. This updates in real-time after every scan.
The Pending Counter (orange number)
An orange number next to a clock icon shows how many scans were made while offline and have not yet synced with the server. Tap it to sync manually once you have a connection.
Connection Status
- Green "Online": Connected to your site. Scans are validated and recorded in real-time.
- Red "No Connection": No internet detected. Scans are saved locally as pending and synchronized when you reconnect.
What You See After a Scan
After scanning a QR code, the full screen shows the result with attendee details.
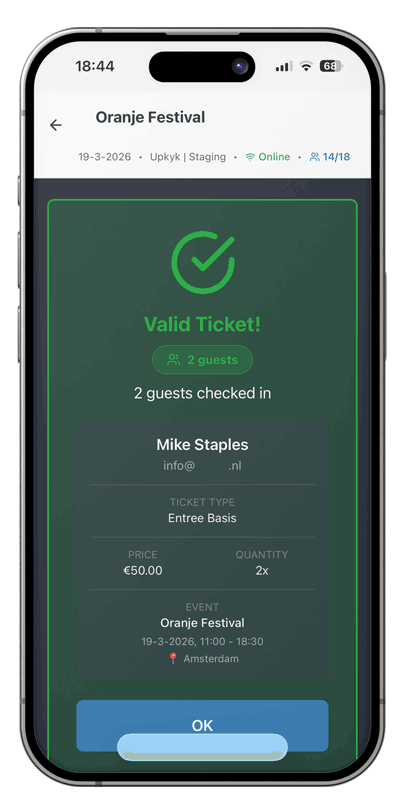
- ✅ Green — Valid Ticket: Shows attendee name, email, ticket type, and how many guests from this order are now checked in. Safe to admit.
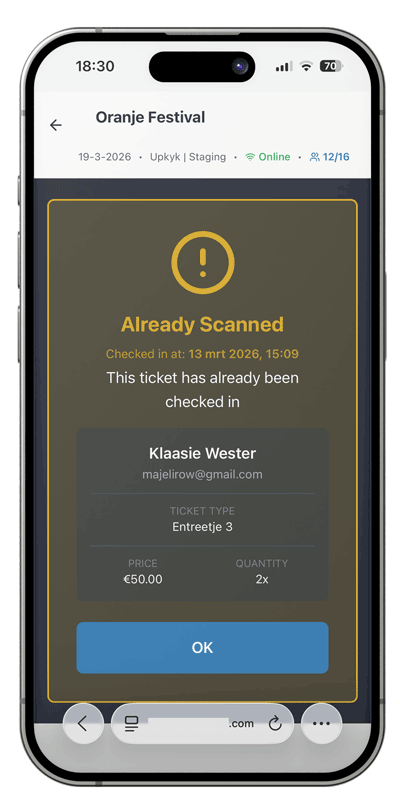
- ⚠️ Yellow — Already Checked In: This ticket was already scanned. Check when it was last used before deciding to admit the visitor.
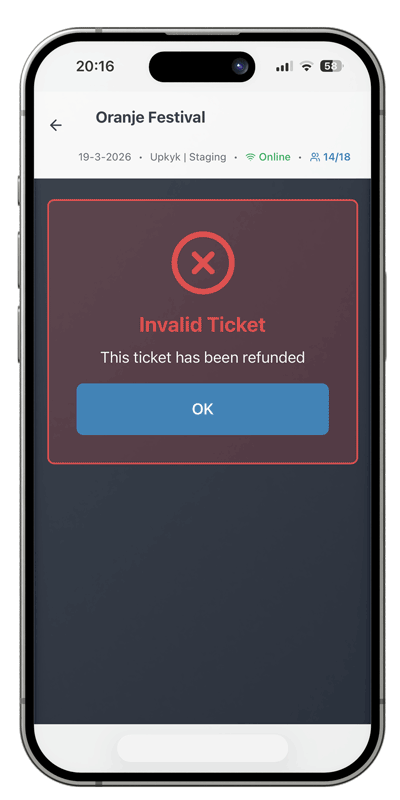
- 🚫 Red — Invalid: QR code not recognized, not valid for this event, or ticket was refunded. Do not admit.
- 🟠 Orange — Pending (Offline): Scan saved locally while offline. Will be validated when you reconnect and sync.
Scanning Without Internet (Offline Mode)
If your internet drops at the venue — don't stop scanning. The scanner automatically switches to offline mode and continues to work.
What Happens When You Scan Offline
- The connection status turns red "No Connection".
- You scan a ticket — an orange Pending screen appears instead of the normal green result.
- The scan is saved on your device. The orange counter in the header increases by one.
- Keep scanning — each ticket is queued. Use your own judgment to admit attendees.

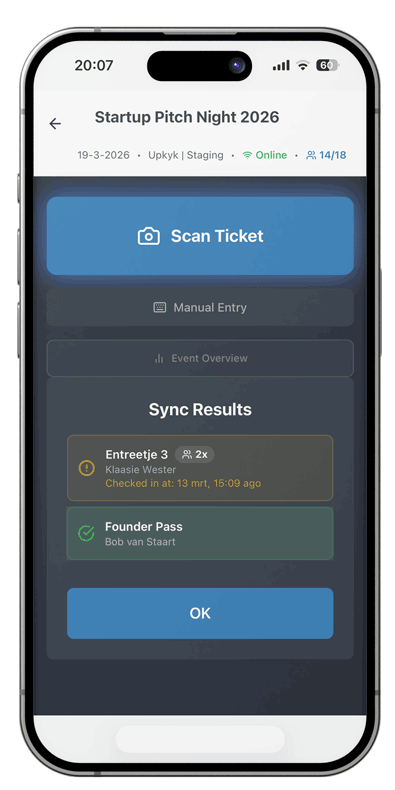
Synchronizing When Back Online
When your connection comes back:
- The scanner automatically detects the reconnection and syncs pending scans.
- Or tap the orange pending counter in the header to sync manually.
- After syncing, each scanned ticket appears in a color-coded list showing its status: green for valid check-ins, yellow for already checked-in tickets, and red for invalid tickets. Each entry displays the ticket type, number of guests, and attendee name — giving you instant visual confirmation of what happened while offline.
- The orange counter drops to zero once all pending scans are resolved.
Event Overview Screen
On the main scanner screen, tap the "Event Overview" button to open a live dashboard of your entire check-in operation.
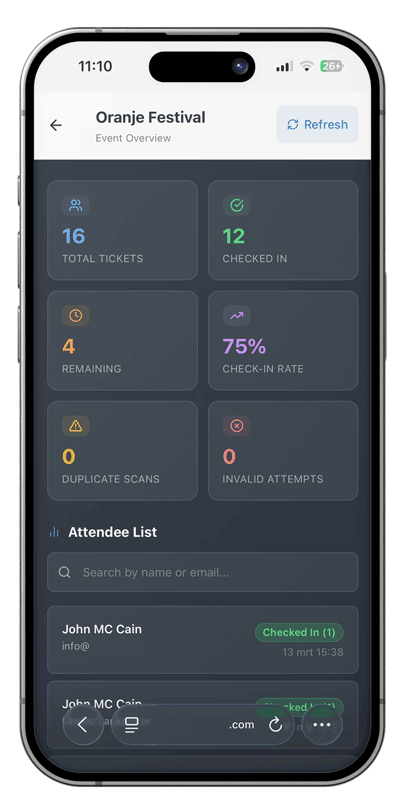
Statistics Cards
- Total Tickets: Total tickets sold for this event.
- Checked In: How many tickets have been scanned and admitted.
- Remaining: Tickets sold but not yet checked in.
- Check-in Rate: Percentage of tickets that have been checked in.
- Duplicate Scans: Number of times an already-checked-in ticket was scanned again. Useful for spotting shared tickets.
- Invalid Attempts: QR codes scanned that were not recognized or not valid for this event.
Attendee List
Below the stats is a searchable list of all attendees for the event. You can:
- Search by name or email to quickly look someone up.
- See at a glance who is checked in (green badge) and who hasn't arrived yet.
- View the exact time of each check-in.
- See the ticket type for each attendee.
Sell at the Door
From version 1.15.0 your team can sell tickets on the spot to walk-up customers, straight from the same scanner you use for check-in. No separate cash box, no second system. You can take payment two ways: cash, or online by QR through your existing Stripe or Mollie checkout.
Open the sell screen
On the main scanner screen, tap Sell at the Door to open the sell form.
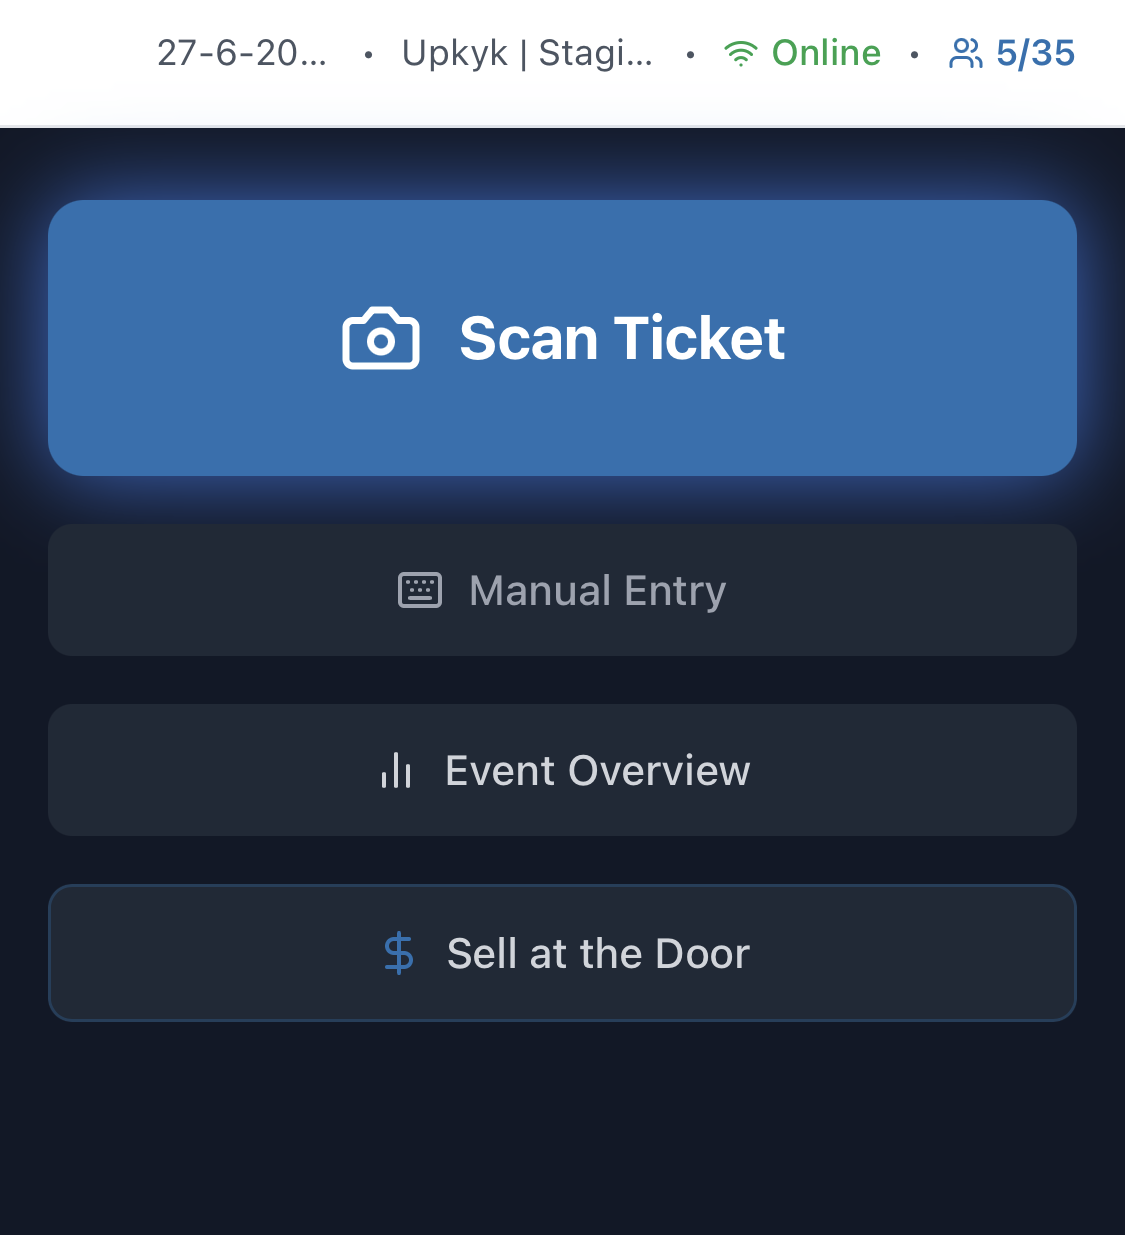
This is the button you tap on the main scanner screen to start a door sale.
Fill in the sale
Enter the customer name and email, choose the ticket type and quantity with the plus and minus buttons, and pick the payment method: Cash or Online (QR). Prices come from your event ticket types and the total is shown at the bottom.
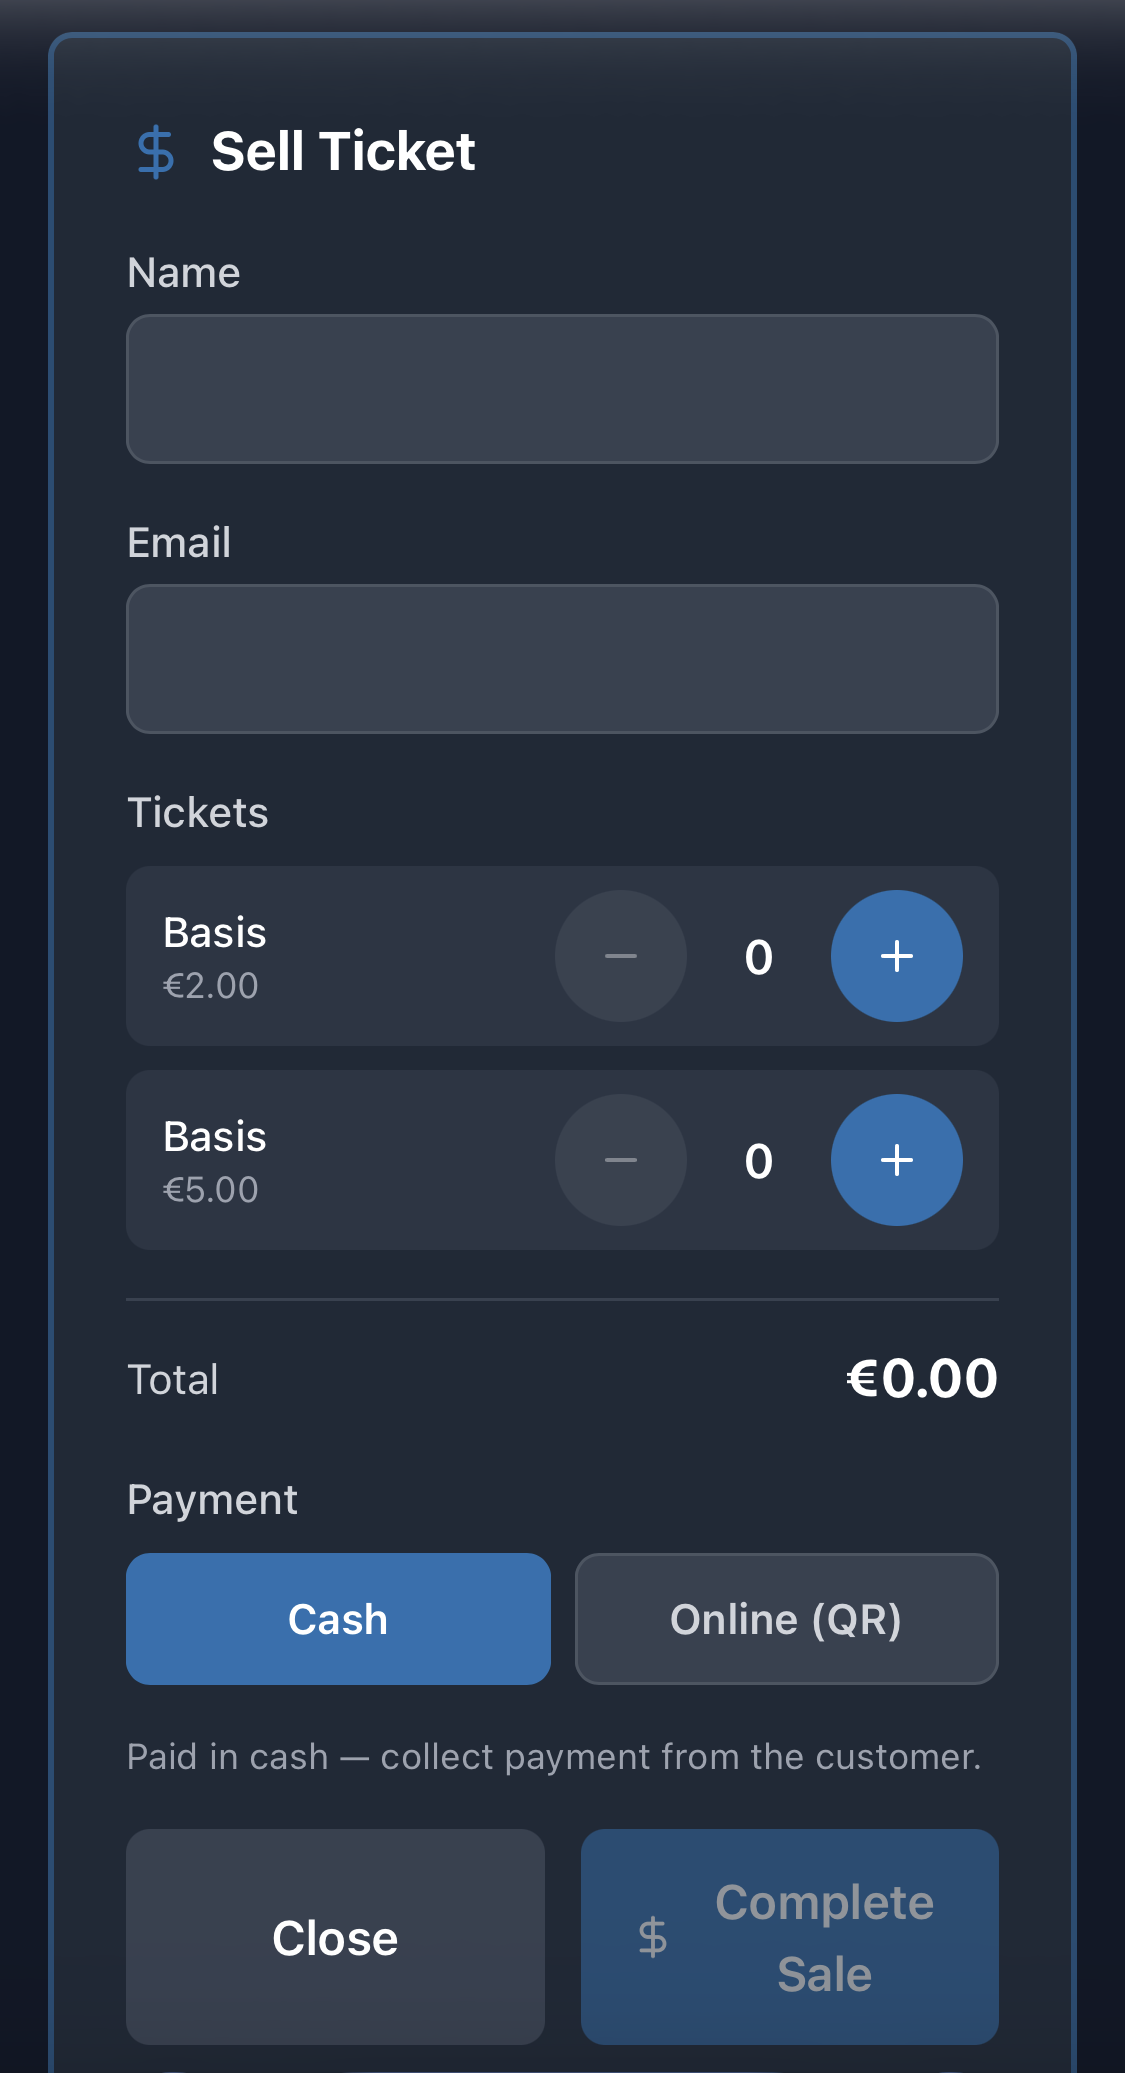
These are the fields you fill in before completing the sale.
Paying with cash
Choose Cash, take the money from the customer, and tap Complete sale. The ticket is issued instantly and the customer receives the standard confirmation email with their QR ticket.
Paying online by QR
Choose Online (QR) and complete the sale. A QR code appears on your screen. Show it to the customer, or use Share or Copy link to send them the payment link. They scan it and pay on their own phone through your existing Stripe or Mollie checkout: cards, iDEAL, Apple Pay or Google Pay. No card terminal needed.
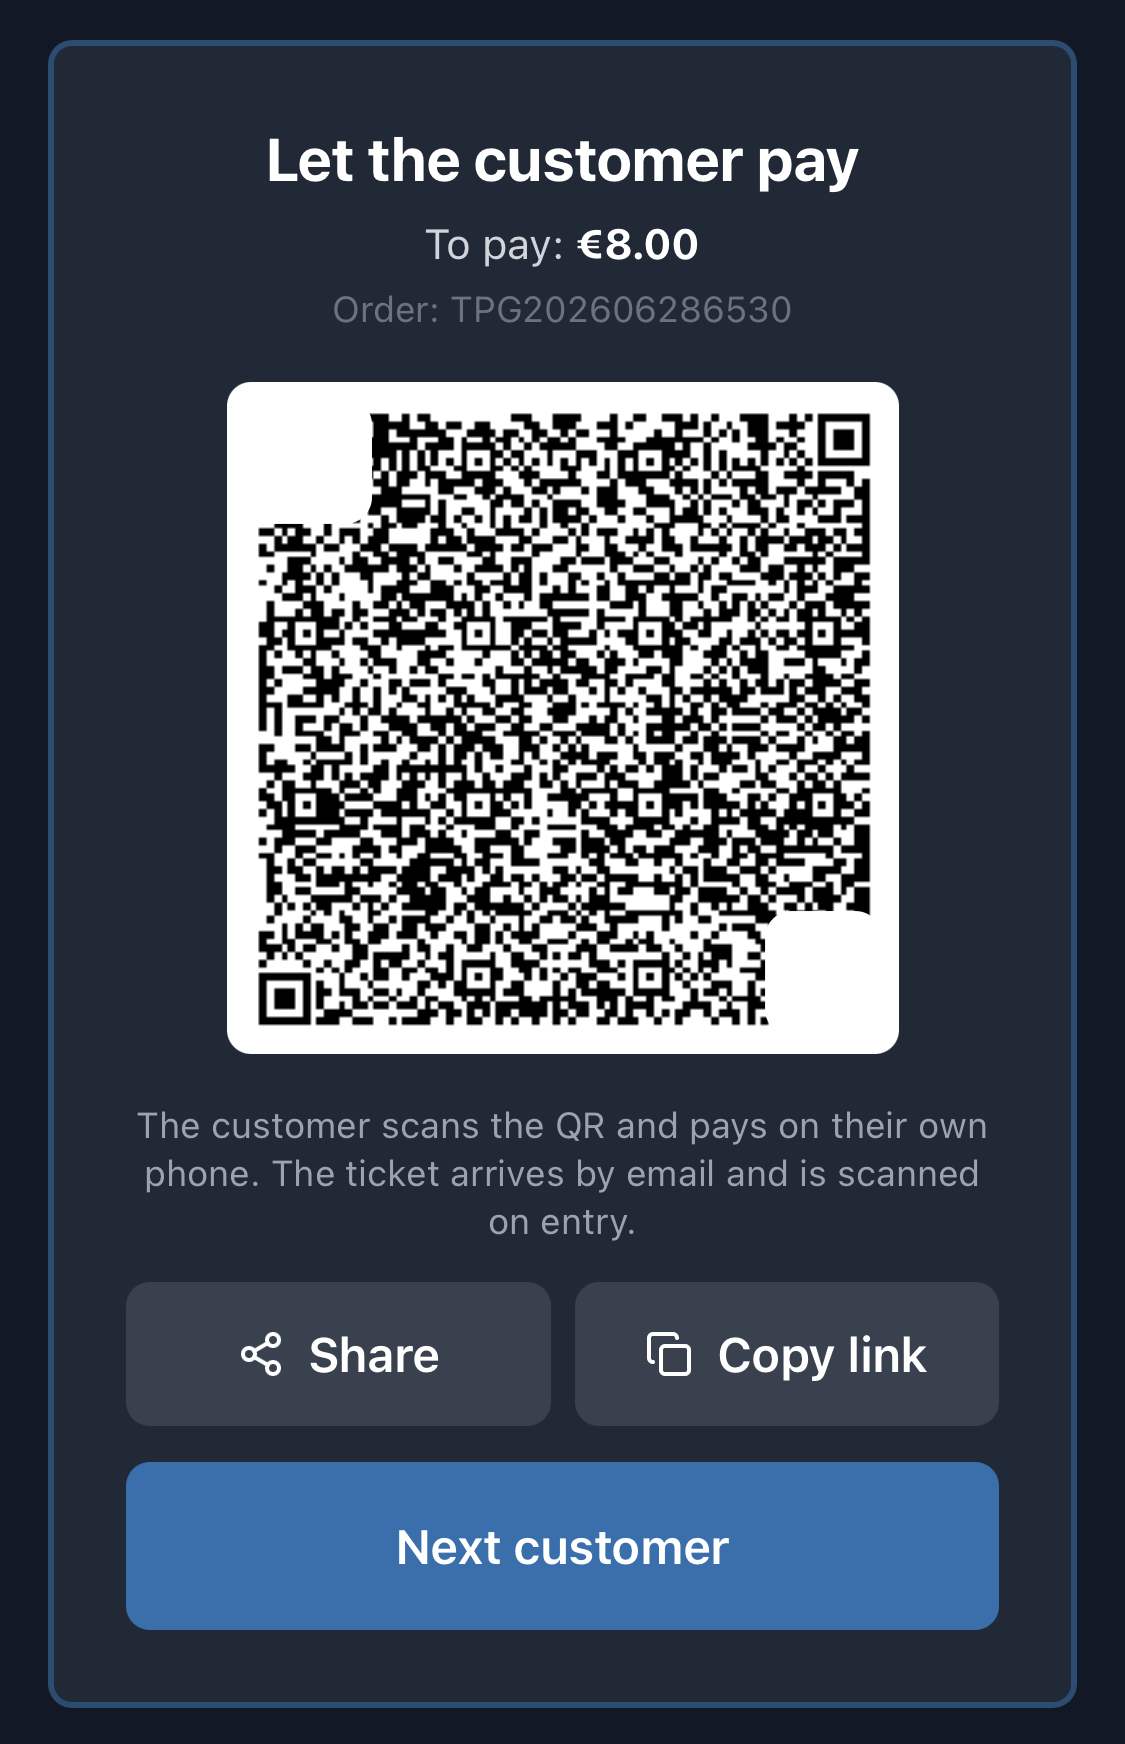
Show this QR to the customer so they can scan it and pay on their own phone.
Where door sales appear
Every door sale, cash or online, flows into your normal Orders and into the live attendee counts, exactly like an online purchase, so you keep one source of truth for the whole event.
Attendees & Export
Attendee Overview
Go to TicketPayGo > Orders to view all orders. Per order you see:
- Name and email address
- Purchased tickets and types
- Payment status
- Check-in status
- Order date
Filtering
Filter orders by:
- Event
- Ticket type
- Payment status (paid, pending, refunded)
- Check-in status
- Date range
Export to CSV
- Go to the orders overview
- Apply filters if needed
- Click Export
- Download the CSV file
The export contains all relevant fields and can be opened in Excel or Google Sheets.
Analytics Dashboard
View statistics per event:
- Revenue and number of tickets sold
- Distribution per ticket type
- Payment method distribution
- Check-in percentage
Styling & Shortcodes
TicketPayGo offers various shortcodes to display events and tickets on your website. Below you'll find an overview of all available shortcodes with their parameters.
Shortcodes Overview
| Shortcode | Purpose | Attributes |
|---|---|---|
[ticketpaygo_events] |
Show an overview of upcoming events | limit, layout, status, upcoming |
[ticketpaygo_event] |
Show a specific event with booking modal | id, layout |
[ticketpaygo_calendar] |
Interactive calendar view (FullCalendar.js) | view, category, filters |
[ticketpaygo_order_lookup] |
Customer order lookup page for managing tickets, resending links, and viewing order details | None (uses magic link from email) |
[ticketpaygo_buy_button] |
Embed just the buy button without the event card | id, class |
[ticketpaygo_event_link] |
Create a text link that opens the event checkout popup | id, link text between the shortcode tags |
#ticketpaygo-event-123 |
Open the event checkout popup from any image, banner, button, or design | Replace 123 with your event ID |
Events Overview Shortcode
Show an overview of your events on any page:
[ticketpaygo_events]Available parameters:
limit="10"Number of events to show (default: 10)layout="grid"Display: grid, list, or card (default: grid)status="active"Filter by status (default: active)upcoming="true"Show only future events (default: true)
[ticketpaygo_events limit="6" layout="grid"]Single Event Shortcode
Show a specific event with booking modal:
[ticketpaygo_event id="123"]id="123"Event ID (required)layout="default"Layout template (default: default)
The template is loaded from templates/event-{layout}.php. The default template is event-default.php.
Calendar View
Show events in an interactive calendar (uses FullCalendar.js):
[ticketpaygo_calendar]view="dayGridMonth"View: dayGridMonth, timeGridWeek, timeGridDay, listMonthcategory=""Filter by category (optional)filters="true"Show view filters above calendar (default: true)
Buy Button Shortcode
Embed just the buy button for a specific event, perfect for hero sections:
[ticketpaygo_buy_button id="123"]id="123"Event ID (required)class="my-class"Additional CSS classes for the wrapper (optional)
The button inherits its text and colors from the event's customization settings and opens the same checkout modal as the full event card.
Open the Checkout Popup from Any Image or Design
You can use your own website design and still open the TicketPayGo checkout popup. This is useful for custom landing pages, hero banners, image blocks, Elementor sections, or any design you already have on your site.
See it in action on our demo playground.
- Open your event in TicketPayGo > Events.
- Copy the Custom Image, Design, or Text Link, for example
#ticketpaygo-event-123. - Paste that link into the URL field of any image, banner, button, or text link on your page.
- When visitors click it, the event checkout popup opens automatically on the same page.
#ticketpaygo-event-123You can also use a full URL with the hash at the end, for example:
https://yourwebsite.com/events/#ticketpaygo-event-123For clickable text inside WordPress content, use:
[ticketpaygo_event_link id="123"]Buy tickets[/ticketpaygo_event_link][ticketpaygo_event_modal id="123"] somewhere on the same page. Most sites do not need this.
Order Management Shortcode
Create a regular frontend page where customers can manage their tickets after opening the magic link from their email:
[ticketpaygo_order_lookup]This shortcode is useful when you want a clean, dedicated customer page without a card layout. It:
- Shows order details when customers arrive via the magic link from their email
- Provides a form to request a new magic link
- Allows customers to resend their tickets
- Works without customers needing to log in
Use it on a simple page if you want the ticket management flow to feel lightweight and focused.
Design Settings
Via TicketPayGo > Design you can adjust the following settings without code, including button colors, card layout, modal styling, and more:
- Card layout: horizontal (16:9) or vertical (3:4)
- Card size: small, medium, or large
- Image area background color
- Content area background color
- Card corners: rounded or square
- Shadow intensity
- Button text, colors, font size, and border radius
- Modal colors and typography
- Calendar colors
- Order lookup page styling
- Featured image, image fit, and title overlay (per event, in the Events tab)
Google Analytics and Facebook Pixel
TicketPayGo automatically integrates with:
- Google Analytics 4: E-commerce events for view_item, add_to_cart, begin_checkout, and purchase
- Facebook Pixel: ViewContent, AddToCart, InitiateCheckout, and Purchase events
Configure your tracking IDs at TicketPayGo > Settings > Integrations.
Elementor Integration
TicketPayGo seamlessly integrates with Elementor, allowing you to design event pages with full visual control. When Elementor is detected, TicketPayGo automatically registers custom widgets.
Available Widgets
Find these widgets in the Elementor panel under the "TicketPayGo" category:
Event Card
Display a single event with full styling control. Select any event and customize colors, typography, and layout directly in Elementor.
Events Grid
Show multiple events in a responsive grid or list layout. Control columns, spacing, and which events to display.
Events Calendar
Interactive calendar view with customizable colors. Visitors can browse events by month, week, or day.
Buy Button
Display just the buy button for a specific event — perfect for hero sections or custom layouts. Opens the same checkout modal as the Event Card.
[ticketpaygo_order_lookup] shortcode is not an Elementor widget, but it works fine inside an Elementor-built page. Use Elementor for the surrounding layout if you want, and keep the order lookup area clean for customers.
How to Use Elementor Widgets
Open Elementor Editor
Edit any page with Elementor. In the widget panel, search for "TicketPayGo" or scroll to the TicketPayGo category.
Drag Widget to Page
Drag the Event Card, Events Grid, or Calendar widget to your desired location on the page.
Select Event(s)
In the Content tab, select which event to display (for Event Card) or configure filters (for Events Grid).
Customize Styling
Switch to the Style tab to customize colors, typography, spacing, and more. You can use global styles or override them per widget.
Styling Options
Each widget offers comprehensive styling controls in the Style tab:
Card Style
- Card background color
- Image area background
- Content area background
- Title and text colors
- Icon and price colors
- Border radius and box shadow
Button Style
- Background and text colors
- Hover colors
- Typography (font, size, weight)
- Padding and border radius
- Border and box shadow
Modal Style
- Header background
- Body background and text colors
- Info grid colors
- Modal button styling
- Price color
Per-Event Customization
You can set custom styling per event in TicketPayGo > Design, on the Events tab. These styles are applied when displaying that specific event, whether via shortcode or Elementor widget. Elementor widget styles take precedence when "Use Global Styles" is disabled.
When is this useful? If you run a single type of event, the Global tab in the Design page is all you need. But if different events need a different look (a festival with a bright orange button, a corporate seminar with a navy one), the Events tab lets you override exactly those settings per event without touching the global defaults. Only the fields you fill in are overridden; anything left blank falls back to the global setting automatically.
Tips for Best Results
- Use Elementor's preview mode to see exactly how your events will look
- Test on different screen sizes using Elementor's responsive mode
- Set up your global styles first in TicketPayGo > Customization, then override only where needed
- For consistent branding, use the same colors across all event widgets
Badges Add-on
The Badges add-on lets you generate print-ready name badge PDFs for your event attendees — directly from your WordPress dashboard. It uses the same QR code as the digital ticket, so no second scan system is needed.
Installing the Badges Plugin
- Log in to your TicketPayGo account and go to Add-ons.
- Enable the Badges add-on and download the plugin (.zip file).
- In WordPress go to Plugins > Add New > Upload Plugin.
- Select the .zip file, click Install Now, then Activate.
- A new "Badges" submenu will appear under TicketPayGo in your WordPress admin.
Badge Templates
Go to TicketPayGo > Badges > Templates to manage your badge designs. Four starter templates are included:
- Classic — Portrait (3×4 in). Blue header block, large centered name. Ideal for conferences and business events.
- Modern — Landscape (4×3 in). White background, purple accent header, bold name. Great for workshops and networking events.
- Minimal — Landscape (3.5×2 in). Thin green color strip, maximum white space. Best when the name should dominate.
- Label — Square (2×2 in). No header, name and QR only. For events where the badge card is pre-printed and you only need a data label.
Template Editor
Click Edit on any template to open the Template Editor. You can configure:
- Header type — solid color or a custom image (your event logo or a banner).
- Header color — pick any brand color for the header block.
- Font — choose from Inter, Roboto, Open Sans, or Montserrat.
- Visible fields — toggle and reorder: Name, Ticket Type, Organization, Function/Role, QR Code, Agenda.
- QR code — always uses the same QR as the digital ticket. Can be shown or hidden.
- Agenda field — shows the ticket type name (e.g. "Workshop A"). Useful for multi-track events.
A live preview updates as you make changes. Click Save Template when done.
Badge Sizes
Each template has a fixed size. The supported sizes are:
- 3×4 in (76×102 mm) — Portrait. Fits standard badge holders and lanyards. Used by Classic.
- 4×3 in (102×76 mm) — Landscape. Most common conference badge size. Used by Modern.
- 3.5×2 in (89×54 mm) — Landscape. Business card size. Used by Minimal.
- 2×2 in (51×51 mm) — Square label. Used by Label.
Attendee Data & Field Collection
Badge data is collected in three ways:
- Checkout fields — Attendees fill in Organization and Function/Role when buying their ticket. Enable these fields under Badges > Settings > Checkout Fields.
- CSV import — Go to Badges > Assign Attendees > Import CSV. Upload a spreadsheet with columns: name, organization, function. This is the fastest option when you have a pre-registered group (e.g. a company block booking, a speaker list, or a sponsored delegation) — you can prepare all badge data in Excel or Google Sheets and import it in one go, without attendees needing to fill in anything at checkout.
- Manual entry — In the Attendees tab, click any attendee to edit their badge fields individually.
Staff & Guest Badges (No Ticket Required)
You can create badges for people who did not buy a ticket — staff, speakers, press, or VIP guests.
- Go to Badges > Attendees > Add Manual Badge.
- Enter the name and select a badge role: Staff, Speaker, VIP, Press, or Volunteer.
- A unique badge ID is generated automatically. The QR code on this badge still works with your scanner.
Generating & Printing PDFs
Go to Badges > Generate to create PDFs. You can generate:
- All attendees — one PDF with all badges for the event.
- By ticket type — e.g. only VIP badges, or only Workshop A attendees.
- Individual badge — reprint a single attendee's badge.
Generated PDFs are available via a secure download link for 24 hours. Download once and print as many copies as needed.
Customizing Badge Fields
You control badge fields in two different places depending on what you want to change:
- Field visibility & order — Open a template via Badges > Templates > Edit. In the template editor you toggle fields on/off and drag them into the order you want (Name, Ticket Type, Organization, Function/Role, QR Code, Agenda). This is saved per template.
- Custom fields per event — In the event editor (Create/Edit Event) you can define your own badge fields, for example "Table number" or "Diet preference". Attendees fill these in at checkout. These event-specific fields then appear in the Assign Attendees tab and in the CSV import columns.
- Field label renaming — Go to Badges > Settings to rename the two standard fields globally: Occupation and Organization. Useful if your event uses different terminology, e.g. "Job Title" or "Company".
Custom per-event fields override the standard Occupation/Organization fields for that event. The template editor always shows you the current field set for the selected event.
QR Code Compatibility
The QR code on every badge is the same as on the digital ticket. Your existing TicketPayGo scanner validates it without any changes — no separate badge scan app, no second system needed.
Troubleshooting
Below you'll find solutions for the most common problems.
1. Payments not coming through
Cause: Webhook not correctly configured.
Solution: Check if the webhook URL is correctly set up with your payment provider. You can find the URL at TicketPayGo > Settings > Payments. Make sure your site uses HTTPS.
2. Emails not being sent
Cause: WordPress cannot send emails.
Solution: Install an SMTP plugin like WP Mail SMTP and configure with your email provider. Test with the built-in test function.
3. Scanner shows "No connection"
Cause: REST API blocked or poor internet connection.
Solution: Check if the WordPress REST API is accessible. Some security plugins block the API. Add an exception for the TicketPayGo endpoints.
4. QR code not recognized
Cause: Poor lighting or damaged QR code.
Solution: Ensure sufficient light. Ask the visitor to increase screen brightness. For a printed ticket: check if the print is not faded.
5. Ticket shows "Already checked in" but visitor is new
Cause: Ticket was forwarded or screenshot shared.
Solution: Check the check-in time in the system. Each ticket can only be used once. The original buyer may have shared the ticket.
6. Events not showing on website
Cause: Event not published or shortcode missing.
Solution: Check if the event is set to "Published". Add the shortcode [ticketpaygo_events] to the desired page.
7. License cannot be activated
Cause: License already active on another domain or expired.
Solution: Log in to your account portal and deactivate the license on the old domain. Check if your subscription is active.
8. Checkout page shows error
Cause: Conflict with another plugin or theme.
Solution: Temporarily disable other plugins to identify the conflict. Check the browser console for JavaScript errors.
9. Mobile Wallet ticket not working
Cause: SSL certificate problem or server configuration (Apple Wallet), or Google Wallet API connection issue.
Solution: For Apple Wallet: check if your site has a valid SSL certificate — .pkpass files require specific MIME types. For Google Wallet: check the QR Scanner connection in your admin panel. Contact support if the problem persists.
10. Slow load times with many events
Cause: Hosting not powerful enough or no caching.
Solution: Use a caching plugin like WP Super Cache or W3 Total Cache. Consider better hosting for events with many visitors. Limit the number of events per page with the limit parameter.
Frequently Asked Questions
Which payment providers are supported?
TicketPayGo supports Stripe, PayPal and Mollie. Each provider has webhook handling, automatic refunds and a test mode.
Can I create multiple ticket types?
Yes. Create VIP, Early Bird, Standard or any desired type with their own prices, capacity and availability periods.
Does it work on mobile?
Yes. The entire experience is mobile-first, from the booking form to the e-ticket. Tickets can be added to Apple Wallet on iPhone or Google Wallet on Android.
How does scanning work with multiple staff?
Create a scanner per staff member or entrance. Each scanner has its own URL that can be opened on any device. Scans are synchronized in real-time.
Does it support recurring events?
Yes. Set up daily, weekly, biweekly, monthly or yearly recurrence. Select specific days and set an end date.
Do I need WooCommerce?
No. TicketPayGo works standalone with native payments. If WooCommerce is installed, you can enable optional order sync to manage all orders in one place — perfect if you also sell products through your store.
Can I customize the ticket templates?
Yes. Copy templates to your theme to customize them, or use the visual customizer for colors and fonts without code.
What happens when my subscription expires?
You cannot create new events and the scanner stops working. Existing tickets remain valid and visitors can still view their tickets.
Are there costs per ticket sold?
No. You pay a fixed monthly amount regardless of how many tickets you sell. The only extra costs are the transaction fees from your payment provider.
Can I process refunds?
Yes. Refunds can be processed via your payment provider dashboard. The ticket status is automatically updated via the webhook.